NB671, 24V, HIGH CURRENT SYNCHRONOUS STEP-DOWN CONVERTER
simplification, the output ripple can be
approximated as:
PCB Layout Guide
1. The high current paths (GND, IN, and SW)
should be placed very close to the device
with short, direct and wide traces.
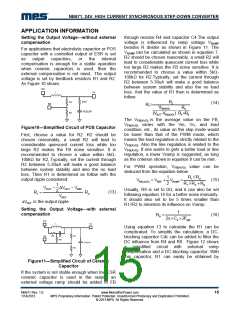
VOUT
V
ΔVOUT
=
×(1− OUT )×RESR
(24)
FSW ×L
V
IN
2. Put the input capacitors as close to the IN
and GND pins as possible.
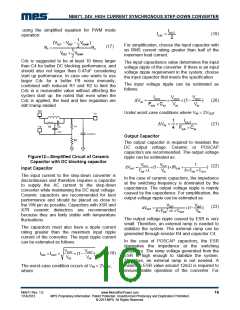
Maximum output capacitor limitation should be
also considered in design application. NB671 has
an around 1.7ms soft-start time period. If the
output capacitor value is too high, the output
voltage can’t reach the design value during the
soft-start time, and then it will fail to regulate. The
maximum output capacitor value Co_max can be
limited approximately by:
3. Put the decoupling capacitor as close to the
VCC and GND pins as possible. Place the
Cap close to AGND if the distance is long.
And place >3 Vias if via is required to reduce
the leakage inductance.
4. Keep the switching node SW short and away
from the feedback network.
CO _MAX = (ILIM_ AVG −IOUT )× Tss / VOUT
(25)
5. The external feedback resistors should be
placed next to the FB pin. Make sure that
there is no via on the FB trace.
Where, ILIM_AVG is the average start-up current
during soft-start period. Tss is the soft-start time.
6. Keep the BST voltage path (BST, C3, and
SW) as short as possible.
Inductor
7. Keep the IN and GND pads connected with
large copper and use at least two layers for
IN and GND trace to achieve better thermal
performance. Also, add several Vias with
10mil_drill/18mil_copper_width close to the
IN and GND pads to help on thermal
dissipation.
The inductor is necessary to supply constant
current to the output load while being driven by
the switched input voltage. A larger-value
inductor will result in less ripple current that will
result in lower output ripple voltage. However, a
larger-value inductor will have a larger physical
footprint, higher series resistance, and/or lower
saturation current. A good rule for determining
the inductance value is to design the peak-to-
peak ripple current in the inductor to be in the
range of 30% to 40% of the maximum output
current, and that the peak inductor current is
below the maximum switch current limit. The
inductance value can be calculated by:
8. Four-layer layout is strongly recommended to
achieve better thermal performance.
Note:
Please refer to the PCB Layout Application Note
for more details.
VOUT
SW × ΔIL
VOUT
(26)
L =
×(1−
)
F
V
IN
Where ΔIL is the peak-to-peak inductor ripple
current.
The inductor should not saturate under the
maximum inductor peak current, where the peak
inductor current can be calculated by:
VOUT
VOUT
(27)
ILP = IOUT
+
×(1−
)
2FSW ×L
V
IN
NB671 Rev. 1.0
1/14/2013
www.MonolithicPower.com
MPS Proprietary Information. Patent Protected. Unauthorized Photocopy and Duplication Prohibited.
© 2013 MPS. All Rights Reserved.
17

 MPS [ MONOLITHIC POWER SYSTEMS ]