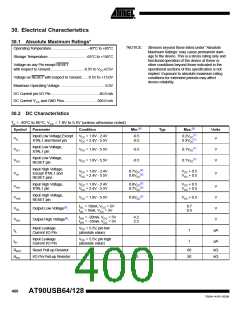
AT90USB64/128
6. Load data low byte using programming instructions 6e. A “0” will program the fuse, a
“1” will unprogram the fuse.
7. Write Fuse low byte using programming instruction 6f.
8. Poll for Fuse write complete using programming instruction 6g, or wait for tWLRH (refer to
Table 29-13 on page 382).
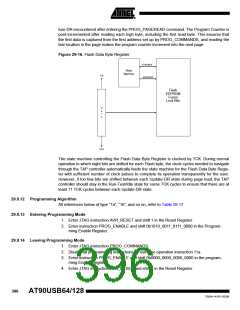
29.9.21 Programming the Lock Bits
1. Enter JTAG instruction PROG_COMMANDS.
2. Enable Lock bit write using programming instruction 7a.
3. Load data using programming instructions 7b. A bit value of “0” will program the corre-
sponding lock bit, a “1” will leave the lock bit unchanged.
4. Write Lock bits using programming instruction 7c.
5. Poll for Lock bit write complete using programming instruction 7d, or wait for tWLRH
(refer to Table 29-13 on page 382).
29.9.22 Reading the Fuses and Lock Bits
1. Enter JTAG instruction PROG_COMMANDS.
2. Enable Fuse/Lock bit read using programming instruction 8a.
3. To read all Fuses and Lock bits, use programming instruction 8e.
To only read Fuse High byte, use programming instruction 8b.
To only read Fuse Low byte, use programming instruction 8c.
To only read Lock bits, use programming instruction 8d.
29.9.23 Reading the Signature Bytes
1. Enter JTAG instruction PROG_COMMANDS.
2. Enable Signature byte read using programming instruction 9a.
3. Load address 0x00 using programming instruction 9b.
4. Read first signature byte using programming instruction 9c.
5. Repeat steps 3 and 4 with address 0x01 and address 0x02 to read the second and third
signature bytes, respectively.
29.9.24 Reading the Calibration Byte
1. Enter JTAG instruction PROG_COMMANDS.
2. Enable Calibration byte read using programming instruction 10a.
3. Load address 0x00 using programming instruction 10b.
4. Read the calibration byte using programming instruction 10c.
399
7593A–AVR–02/06

 ATMEL [ ATMEL ]