Precautions (Common)
Note: The undermentioned is common for all H7GP/H7HP models.
Power Supplies
Other
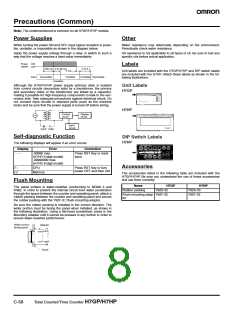
When turning the power ON and OFF, input signal reception is possi-
ble, unstable, or impossible as shown in the diagram below.
Water resistance may deteriorate depending on the environment.
Periodically check water resistance.
Apply the power supply voltage through a relay or switch in such a
way that the voltage reaches a fixed value immediately.
Oil resistance is not applicable to all types of oil. Be sure to test any
specific oils before actual application.
ON
OFF
Power
supply
Labels
200 ms 0 to 90 ms
0 to 2 s
5 ms
Unit labels are included with the H7GP/H7HP and DIP switch labels
are included with the H7HP. Attach these labels as shown in the fol-
lowing illustrations.
Input Impossible
Possible
Unstable Impossible
Unstable
Although the H7GP/H7HP power supply (primary side) is isolated
from control circuits (secondary side) by a transformer, the primary
and secondary sides of the transformer are linked by a capacitor,
making it possible for high-frequency components to leak to the sec-
ondary side. Take adequate precautions against electrical shock. Do
not connect input circuits to exposed parts (such as the machine
body) and be sure that the power supply is turned off before wiring.
Unit Labels
H7GP
H7HP
Control
circuit
Display
circuit
Input
circuit
Self-diagnostic Function
The following displays will appear if an error occurs.
DIP Switch Labels
H7HP
Display
----
Error
-99999 max.
(H7HP, 6-digit model)
-99999999 max.
Correction
Press RST Key or reset
input
(H7HP, 8-digit model)
Accessories
The accessories listed in the following table are included with the
H7GP/H7HP. Be sure you understand the use of these accessories
and use them correctly.
e1
e2
CPU
Press RST Key or turn
power OFF and then ON
Memory
Flush Mounting
Name
H7GP
Y92S-32
H7HP
Y92S-33
Y92F-33
The panel surface is water-resistive (conforming to NEMA 4 and
IP66). In order to prevent the internal circuit from water penetration
through the space between the counter and operating panel, attach a
rubber packing between the counter and operating panel and secure
the rubber packing with the Y92F-3@ flush-mounting adaptor.
Rubber packing
Flush mounting adap- Y92F-32
tor
Be sure the rubber packing is installed in the correct direction. The
wider portion must be facing the panel when installed, as shown in
the following illustration. Using a flat-head screwdriver, press in the
Mounting Adapter until it cannot be pressed in any further in order to
ensure water-resistive performance.
Wider portion
facing panel
Adapter
Panel
C-58
Total Counter/Time Counter H7GP/H7HP

 OMRON [ OMRON ELECTRONICS LLC ]