TMC4671 Datasheet • IC Version V1.00 | Document Revision V1.04 • 2018-Dec-11
148 / 157
11 Setup Guidelines
For easy setup of the TMC4671 on a given hardware platform like the TMC4671 Evaluation-Kit, the user
should follow these general guidelines in order to safely set up the system for various modes of operation.
These guidelines fit to hardware platforms which are comparable to the TMC4671-
Evaluation Kit. If system structure differs, configuration has to be adjusted.
Please also make use of the RTMI Adapter and the TMCL IDE to setup the system
as it reduces commissioning time significantly.
Info
Step 0: Setup of SPI communication
As a first step of the configuration of the TMC4671 the SPI communication should be tested by reading
and writing for example to the first registers for identification of the silicon. If communication fails, please
check CLK and nRST signals. For easy software setup the TMC API provided on the TRINAMIC website can
be used.
Step 1: Check connections
Register TMC_INPUTS_RAW can be accessed to see if all connected digital inputs are working correctly e.g.
sensor signals can be checked by turning the motor manually.
Step 2: Setup of PWM and Gatedriver configuration
The user should choose the connected motor and the number of polepairs by setting register MO-
TOR_TYPE_N_POLE_PAIRS. For a DC motor the number of pole pairs should be set to one. The PWM can
be configured with the corresponding registers PWM_POLARITIES (Gate Driver Polarities), PWM_MAXCNT
(PWM Frequency), PWM_BBM_H_BBM_L (BBM times), and PWM_SV_CHOP (PWM mode). After setting the
register PWM_SV_CHOP to 7 the PWM is on and ready to use.
Please check PWM outputs after turning on the PWM, if you are using a new hardware design.
Step 3: Open Loop Mode
In the Open Loop Mode the motor is turned by applying voltage to the motor. This mode is useful for
test and setup of ADCs and position sensors. It is activated by setting the corresponding registers for
PHI_E_SELECTION, and MODE_MOTION. With UD_EXT the applied voltage can be regulated upwards until
the motor starts to turn. Acceleration and target velocity can be changed by their respective registers.
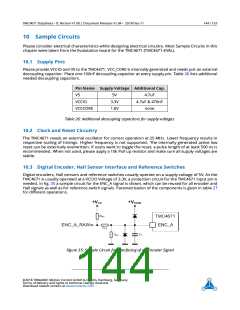
Step 4: Setup of ADC for current measurement
Please setup the current measurement by choosing your applications ADC configuration. Make sure to
match decimation rate of the Delta Sigma ADCs to your choosen PWM frequency.
When the motor turns in Open Loop Mode the current measurement can be easily calibrated. Please
match offset and gain of phase current signals by setting the corresponding registers. Please also make
sure for a new hardware setup, that current measurements and PWM channels are matched. This can
be done by matching phase voltages and phase currents. Register ADC_I_SELECT can be used to switch
relations.
Step 5: Setup of Feedback Systems
In Open Loop Mode also the feedback systems can be checked for correct operation. Please configure reg-
isters related to used position sensor(s) and compare against Open Loop angles. Use encoder initialization
routines to set angle offsets for relative position encoders according to application needs.
Step 6: Setup of FOC Controllers
Please configure your application’s feedback system and configure position and velocity signal switches
accordingly inside the FOC. Configure controller output limits according to you needs.
Setup PI controller parameters for used FOC controllers. Start with the current controller, followed by the
velocity controller, followed by the position controller. Stop configuration at your desired cascade level.
TRINAMIC recommends to set the PI controller parameters by support of the RTMI, as it supports realtime
access to registers and the TMCL IDE offers tools for automated controller tuning. Controller tuning
without realtime access might lead to poor performance.
Please choose afterwards your desired Motion Mode and feed in reference values.
Step 7: Advanced Functions
For performance improvements Biquad filters and feed forward control can be applied.
©2018 TRINAMIC Motion Control GmbH & Co. KG, Hamburg, Germany
Terms of delivery and rights to technical change reserved.
Download newest version at www.trinamic.com

 TRINAMIC [ TRINAMIC MOTION CONTROL GMBH & CO. KG. ]