D Subminiature
Combo D
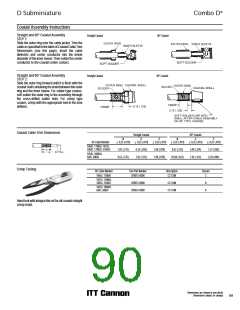
Coaxial Assembly Instructions
Straight and 90° Coaxial Assembly
Straight Coaxial
90° Coaxial
STEP 1:
Slide the outer ring over the cable jacket. Trim the
cable as specified in the table of Coaxial Cable Trim
Dimensions (see this page). Insert the cable
dielectric and center conductor into the inside
diameter of the inner sleeve. Then solder the center
conductor to the coaxial center contact.
Straight and 90° Coaxial Assembly
STEP 2:
Straight Coaxial
90° Coaxial
Slide the outer ring forward until it is flush with the
coaxial shell containing the braid between the outer
ring and the inner sleeve. For solder type coaxes,
soft solder the outer ring to the assembly through
the cross-drilled solder hold. For crimp type
coaxes, crimp with the appropriate tool in the area
defined.
Coaxial Cable Trim Dimensions
Straight Coaxial
90° Coaxial
N
O
P
N
O
P
RG Cable Number
0,25 (.010)
0,25 (.010)
0,25 (.010)
0,25 (.010)
0,25 (.010)
5,94 (.234)
7,92 (.312)
0,25 (.010)
196/U, 178B/U, 187/U,
188/U, 179B/U, 316B/U
7,92 (.312)
9,52 (.375)
6,35 (.250)
7,92 (.312)
1,98 (.078)
1,98 (.078)
9,52 (.375)
1,57 (.062)
2,39 (.094)
195/U, 180B/U,
58/U, 58B/U
10,69 (.422)
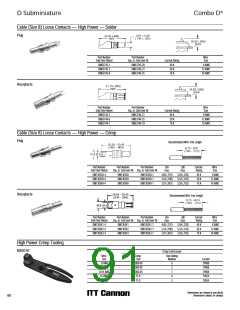
Crimp Tooling
RG Cable Number
Tool Part Number
Description
Closure
196/U, 178B/U
070051-0000
CCT-DM
CCT-DM
CCT-DM
C
B
A
187/U, 179B/U,
188/U, 316B/U
070051-0000
070051-0000
195/U, 180B/U,
58/U, 58B/U
Hand tool with integral die set for all coaxial straight
crimp braid.
Dimensions are shown in mm (inch)
Dimensions subject to change
89

 ITT [ ITT Cannon ]